
Retainer Agreement Invoicing: A Complete Guide
Chasing new clients every month is exhausting. One month you're busy, the next you're scrambling to fill your calendar. A retainer agreement changes that equation entirely. Instead of billing after the fact and hoping for the best, you lock in recurring revenue with clients who value your ongoing work.
But retainer agreements only work when you invoice them correctly. Get the billing wrong, and you create confusion, late payments, and awkward conversations. This retainer agreement invoicing guide walks you through everything: what retainers are, how to structure your agreement, what belongs on your invoice, and how to handle the tricky situations that come up along the way.
What Is a Retainer Agreement?
A retainer agreement is a contract between you and a client that guarantees payment for a set amount of work over a defined period. Instead of quoting individual projects, you agree on a fixed monthly fee in exchange for a predetermined number of hours, deliverables, or availability.
For example, a graphic designer might set up a retainer for 15 hours per month at $1,500. The client gets priority access to the designer's time, and the designer gets reliable, predictable income.
Retainers work well for ongoing relationships where the client needs regular support: content creation, bookkeeping, marketing, IT maintenance, design work, or consulting. If you're already using a freelance invoice template, adding retainer invoicing to your workflow is straightforward. The agreement spells out what's included, what costs extra, and how billing works so both sides know exactly what to expect.
The key difference between a retainer and a standard project contract is timing. With project-based work, you typically invoice after delivery. With a retainer, you invoice at the start of each service period, before the work begins.
How Retainer Invoicing Differs from Standard Invoicing
If you've been billing project by project, retainer invoicing requires a mindset shift. Here are the main differences you need to understand.
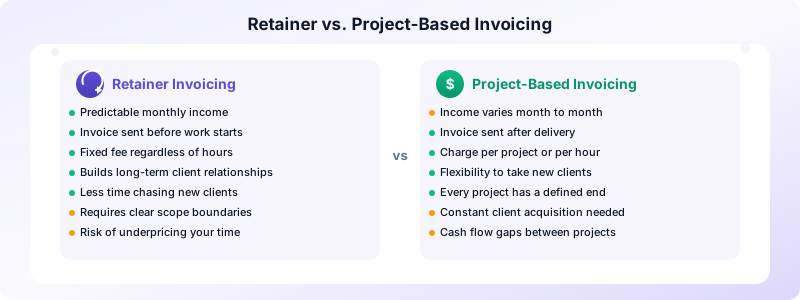
You invoice in advance. Standard invoices request payment for completed work. Retainer invoices request payment before the service period starts. If your retainer covers April, you send the invoice in late March and expect payment by April 1st.
The amount stays fixed. Unless the client requests work beyond the agreed scope, the invoice total is the same every month. This predictability is one of the biggest advantages of retainer billing for both you and your client.
You track hours even with fixed fees. Even though the client pays the same amount regardless, you should track your time. This helps you confirm the retainer is profitable, provides data for rate adjustments, and gives clients transparency into how their retainer is being used.
Payment terms are usually shorter. Because retainers are paid before work starts, many freelancers use "due on receipt" or net 7 payment terms rather than net 30. You don't want to start a month of work without payment confirmed.
What to Include in Your Retainer Agreement
Before you send your first retainer invoice, you need a solid agreement in place. This document protects both you and your client. Here's what to cover.
Scope of services. List exactly what's included in the retainer. Be specific. "Marketing support" is too vague. "Up to 4 blog posts and 12 social media graphics per month" is clear and enforceable.
Monthly fee and billing cycle. State the retainer amount, when invoices will be sent, and when payment is due. For example: "$2,000 per month, invoiced on the 25th of the prior month, due on the 1st."
Hours or deliverables cap. Define the upper limit. Whether you structure it as hours (20 hours per month) or deliverables (8 illustrations per month), your client needs to know where the retainer ends and additional billing begins.
Overage rates. Specify what happens when work exceeds the retainer scope. A common approach is to charge your standard hourly rate for any hours beyond the cap, billed separately at the end of the month.
Unused hours policy. Decide whether unused hours roll over to the next month, expire, or partially carry forward. The simplest approach is "use it or lose it" since rollover policies can create complicated tracking and liability.
Late payment terms. Include a late fee clause, such as 1.5% per month on overdue balances. This motivates timely payment and protects your cash flow.
Cancellation terms. Require 30 days' written notice for cancellation. This gives you time to find replacement income and prevents a client from vanishing mid-month.
What to Include on Your Retainer Invoice
Your retainer invoice looks similar to a standard invoice, with a few important additions. Here's the complete checklist.
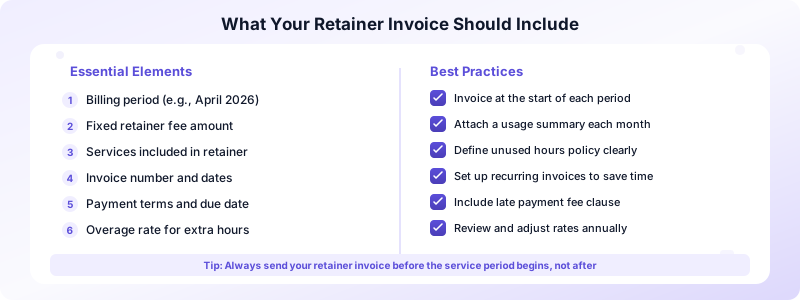
Every retainer invoice should include your business name and contact details, the client's name and address, a unique invoice number, the invoice date and payment due date, the billing period the invoice covers, the fixed retainer fee, a description of services included, your accepted payment methods, and any applicable taxes.
The billing period is the critical difference. A standard invoice might describe "Website redesign project" while a retainer invoice specifies "Monthly retainer: April 2026 — Content marketing services (up to 20 hours)." This clarity prevents disputes and makes your accounting easier.
If the previous month included overage charges, add those as a separate line item on the current invoice. Keep the retainer fee and overages clearly separated so the client can see what's standard and what's extra.
How to Handle Overages and Scope Creep
Scope creep is the biggest risk in retainer relationships. A client starts with small requests that slowly expand beyond the agreement. Before you know it, you're working 30 hours on a 20-hour retainer.
Set boundaries early. When a request falls outside the retainer scope, say so immediately. A simple message works: "This falls outside our current retainer. I'm happy to take it on at my standard rate of $X/hour. Want me to proceed?"
Send usage reports. At the midpoint of each billing period, send your client a brief update showing hours used versus hours remaining. This keeps both sides informed and prevents surprises.
Invoice overages promptly. Don't wait months to bill for extra work. Include overage charges on the very next invoice with a clear breakdown of additional hours and the agreed rate.
Renegotiate when patterns emerge. If a client consistently exceeds the retainer for three or more months, it's time to adjust the agreement. Propose a higher retainer that better matches their actual needs rather than constantly billing overages.
Setting Up Recurring Invoices for Retainers
One of the best things about retainer invoicing is that you can automate it. Since the amount and details are the same each month, you don't need to manually create a new invoice every billing cycle.
With Invoices Customers, you can create a retainer invoice once and use it as a template for each billing period. Set up your client's details, the retainer amount, and your payment terms, then generate a professional PDF invoice in seconds each month. Because the app works right from your phone, you can send your retainer invoice from anywhere, even when you're on the go.
Here's the monthly workflow that keeps retainer billing simple:
- 5 days before the period starts: Create and send the retainer invoice.
- Day 1 of the period: Confirm payment received. If not, send a reminder.
- Mid-period: Send a usage report showing hours consumed.
- End of period: Log final hours. Note any overages for the next invoice.
- Repeat: Copy the previous invoice, update the billing period, add overages if needed, and send.
This process takes less than 10 minutes per client per month. That's a tiny investment for guaranteed, predictable income.
One final tip on pricing: calculate your effective hourly rate from project work, then apply a modest discount (10-15%) for retainer clients who commit to ongoing work. If you charge $100/hour and offer a 20-hour retainer, that puts you at $1,700-$1,800 per month. Don't discount more than 15% since the client is getting guaranteed priority access to your time. Review your rates every 6-12 months and include a rate review clause in your agreement.
Ready to set up retainer invoicing for your freelance business? Download Invoices Customers and create your first professional retainer invoice in under a minute. The app keeps your client details organized, generates polished PDF invoices, and works completely offline with no account required. It's the fastest way to get your retainer billing on track and build the steady income you deserve.
